All grains contain peptides that mimic morphine or endogenous opioid substances. This is where I deal with my latest loaf craving. Get your bread-based exorphin fix here.

Thursday, July 22, 2010

Everyday Bread #49 - Boiled Whole Grains Bread


A Boiled Whole Grains Bread


The ideas for this bread really developed due to other recipes I've made: James Beard's Cracked Wheat bread, and more recently the granola (bars) I made (by mistake) without any eggs.  The first one told me that you really don't need to let your boiled grains cool down completely before using them; the gums in the boiled grains are sticky enough to help give some cohesion to the loaf.  The second one gave me the idea that you could add some dough to some (boiled) grains and you might get some cohesion without requiring it to have an egg.

But truth be told, Reinhart has some boiled grain breads too.  I have already baked his Multigrain Sandwich Loaf, which can use boiled grains.  And the Sandwich Struan can be made this way.  But this was going to be a quick and dirty recipe, pure play.  The dough was actually from a Sourdough English Muffin recipe.  This is a sweet dough, it already contains molasses.  I would just add some boiled grains to it.

This was the whole dough; I would only use half of it with these grains.

I gathered a few grains together that I thought I'd like to try boiled.  I used 1/4 cup each of:

  • flax
  • millet
  • roasted buckwheat
  • cracked wheat
  • whole rye berries
  • red quinola
I boiled this over 10 minutes in 2 cups of water, until all was absorbed.  The scent of the buckwheat was a bit overpowering.  I think this was because it was roasted already, but I don't know.  What I really wanted to use was barley, I think.  I think I have some pearled barley, but the bag wasn't properly labeled.  Damn.

Boiling the Grains

The pot requires an extensive clearnup from the boiled grains sticking to it.  Maybe a little oil in the pot might help this?  Or more attentive stirring?

The Dough falls apart with the hot grains added and kneaded in.

I removed it 5 minutes from the heat before I tried to mix it into the dough.  The dough had already risen once, and had been divided, and rested another 15 minutes.  So the gluten was already well developed in the dough.  But when I added these grains, the gluten fell apart and I had a mess.  I think the grains were still very hot, and when they hit the dough, the dough just broke its gluten.

The Dough doesn't even fill the tin from one end to the other

That's when I decided I'd just chalk this up to another failure.  I would just dump it into a loaf pan, though, and see what happened when I baked it.  The dough was not well developed gluten anymore.  It was just glop, and continued kneading wasn't helping.  I sort of poured it, scraped it, into a loaf tin. And I didn't expect it would rise any more.  Shoot, it didn't even fill to one end of the pan.

I let it sit about 30 minutes and I noticed that there was some activity underneath the towel.  It was rising after all.  I preheated the oven to 425.  But by the time the oven was preheated, the tin was now overflowing.
Overflow

I put it into the oven.  But this dough was jiggly.  There wouldn't be any gluten cloak.  I thought it would continue to overflow the loaf tin, so I placed it on a baking sheet to catch the drips.  I used steam for the crust, but it could have been improved by brushing on a glaze.

No oven spring: oven droop

I baked it at 400 degrees F. for 20 minutes, then turned the loaf for another 20 minutes.

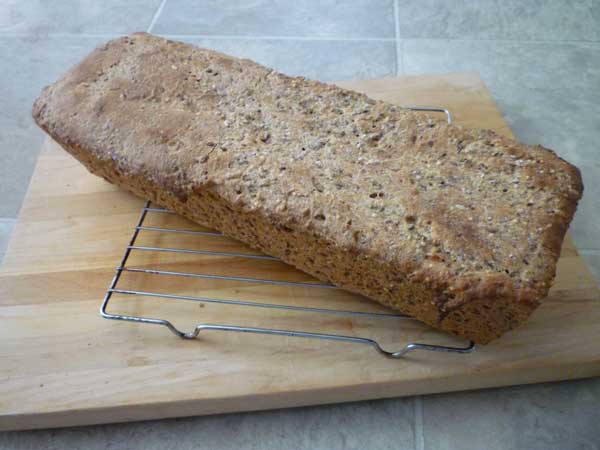
I dreaded scraping this loaf from the well-oiled, no-stick pan.  I let it sit in the pan for 30 minutes before taking a knife to the edges to try to get it out of there.  It actually came out intact, and quite easily.  Too easily.  I touched a finger to the bottom of the loaf.  Still felt like jelly.  Gooey.  I put it back into the oven, upside down on the baking tray, for another 12 minutes at 350 degrees (though most of that time was preheating).  That helped form some crust along the bottom half of the loaf, but I was still worried about the interior.


The globs that had overflowed onto the pan tasted like the marriage of blah unsweetened crunchy overcooked granola bars and burnt toast.  Was this the taste I was going for?


The crumb is dense, and greyish brown, full of specks of grains.  I can make out the millet and red quinoa easily.  When you get your nose right next to it, you can smell the buckwheat, which is still overpowering.  But it is a fairly good bread despite that, full of interesting flavours.  It toasts nicely.


Notes to Myself
  • Try this again using a real dough.  Use delayed fermentation in the fridge to develop flavour, use some whole what and some rye flours.  Try using only 10% all purpose.  Try it without any.
  • Perhaps more enrichment: why not some honey?  Hey, why not an egg?
  • Try glazing the finished loaf.  Hey, why not use an egg?
  • Put some oil into your boiling water so the gluey grains don't stick as much.
  • Try waiting 10 or 15 minutes before adding the boiled grains.  They don't have to be room temperature, but at least they shouldn't destroy the gluten structure that is already there, should they?

Everyday Bread #48 - Sourdough Discard English Crumpets

Sourdough Discard English Muffins

While searching for something to do with my sourdough discards, I came across this recipe the other day.  Although it uses all purpose flour, I thought I'd try it and see if I could eventually make a whole wheat version.  But first try, I wanted to bake it with the ingredients the recipe called for.

Unfortunately, that is about all I did, in terms of following the recipe.  This recipe calls for a slow fermentation in the refrigerator, and I didn't have the time.  I knew that this meant the flavours would not develop completely, but I was still hoping that the English Muffins I was making would have a nice rise.  The last time I tried this with sourdough discards, I was using baking powder to make English Crumpets.  This method uses yeast and a long refrigerated fermentation for English Muffins.  Since I was using neither, how could I expect these to turn into nice holey English Muffins?

I decided to play with the recipe as well, because I had another idea in the back of my mind for another bread.  So I doubled the recipe and would use half for my English Muffins and half for my latest idea.  It was to be a day of pure dough play.

The original recipe is here, thank you homesteading blogspot.  It uses only 1 cup of sourdough (that is why I thought I'd double it, otherwise I was going to be tossing a cup each of rye and whole wheat).  I reproduce it here for my own use, but anyone else should see the original.


Dough:

  • 2 teaspoons yeast
  • 1 cup sourdough starter
  • 1 cup warm water
  • 2 tablespoons molasses or sugar
  • 1-2 tablespoons extra virgin olive oil
  • 2 teaspoons kosher salt
  • 3 cups all purpose unbleached flour


In a larger bowl combine yeast, (sourdough starter), water, molasses, oil and salt.
Wait five minutes and then add 1/2 the flour, stirring until smooth.
Continue to add flour until it won't stir.
Then turn it out on a floured countertop to incorporate the rest by kneading.
Once it is smooth and springy, place in an oiled bowl and cover it.
Original instructions are to refrigerate it 4-6 hours.
Then take it out and divide into 3 oz or 85g portions.
Form them into mini boules, dip in corn meal and place on baking sheet sprinkled with corn meal.
Let rest until doubled, about an hour.
Fry the muffins in a skillet preheated 10 minutes, set between low and medium heat.
Fry the muffins in the pan 6-8 minutes on one side, then 6-8 minutes on the other side.
Remove the muffins and pile them up under foil so that they continue to cook their insides.
To eat, slice them and toast them or fry them.


The changes I made to the recipe:

It isn't clear from the original recipe when to add the starter.  I added it with the yeast and water, in other words right away.  I also didn't add warm water, I added cold water.  Needless to say, there was no foaming action in this wetness, not even after 5 minutes.  Something was happening under the oil layer, though.  I didn't think to snap a picture because I was using all purpose and it didn't seem to fit into the blog.  Later though, I changed my mind and began snapping a few photos.

It has been so long since I made an all purpose loaf, I was once again surprised by how quickly the gluten forms, and how well the dough holds together because of it.  No wonder home bakers generally avoid whole wheat.  It just doesn't perform the same way at all.  So you think you are failing all the time.

I let the double recipe rise in an oiled bowl about an hour and a half.  At that point, I divided it, and set aside one half for my other experiment this morning, and continued on with the half recipe to make these 'muffins'.


I measured out the first 85g piece of dough, but after that, I just guessed, so some of the tiny boules I was forming are either a little bit heavy or a little bit light.  And I didn't have any corn meal, so instead I just dusted my little buns/muffins with corn flour.

They rose in about an hour, and then I fried them.  I found it difficult to get the right heat.  Medium on our stove is too hot, and the corn flour burned until I turned it down a bit.  And of coure, there were never any of the actual English Muffin style holes in the crumb.  These tasted like English Muffins on the crust, but they were really just buns.


But the smell of them baking was making my wife hungry, so I toasted a couple of them, still warm, and she had them with honey.  I asked her how she liked it.  "Tastes good, but there is all this flour on the outside of them that is too thick."  She was out on the deck, try ing to brush off the corn flour.


Notes to Myself
  • Try this again using the recipe.  Use delayed fermentation in the fridge; use cornmeal.  
  • Try this again using some whole wheat and some rye flours.  You probably will need to keep about 50% of it at least all purpose though.
  • Heat the skillet to somewhere between low and medium.

Tuesday, July 20, 2010

Reinhart's Potato Onion Rye Meteil


Reinhart's Potato Onion Rye Meteil

I certainly don't need another rye loaf.  There are currently 4 of them on the counter that I am busily eating.

But there were potatoes for dinner last night, and leftover potatoes and potato water saved.  There is Rosemary and onions growing in the garden, ripe for the picking.  Rye bread keeps well, so they say.  The timing was perfect.  Why not carve another notch in my belt (or should I release another notch on my belt, as I go through the carbs?), as I tick off another loaf on the list of Reinhart breads?  Why not bake the Potato Onion Rye Meteil, since I've been playing with meteil loaves so much recently?  I can't think of any good reason why not.

DAY 1:

I made up the soaker and the starter at the same time; the soaker was refrigerated right away; the starter sat out for 8 hours, and then was also refrigerated.  I planned to bake the following day, at about the 30 hour mark.  It turned out to be more like 36 hours.

Soaker: uses Potato Water

The Starter uses a Whole Wheat Motherstarter: it is a bit gooey but comes together well.

The Starter sits out for 6 hours, and becomes the consistency of meringue.  I degas it and put it away in the refrigerator.


The Starter before it rises...

...and just before refrigeration.

DAY 2:


I had a few troubles when I set out to gather the ingredients for the final dough.  I had set aside some potatoes, but I hadn't weighed them, so I didn't have quite enough.  In his commentary, Reinhart says that you might have some leftover potatoes but you might not have the potato water, so he gives a work-around for that.  Well, I had the potato water, and I had the potatoes, but I didn't have quite enough.  I remembered that my mom used to add some milk and butter to the potatoes when she was mashing them, to 'extend' them, if company was coming.  I had some milk ready to add, to bring the weight of the ingredients up, but before adding it I wanted to make sure that the hydration wouldn't be affected too much.  Turns out, I felt that I didn't require it, so I didn't add it.

That's how much Rosemary you need

You need more potatoes than that!

My onion was a bit small, too: only 64g.  I tossed in the greens of the onion as well, but that was only another 16g.  The potato was 90g low, and the onions were 33g low in weight.  I could add the extra weight in flour, but I decided to just go with what I had.  I had the milk ready, but I added nothing to make up for the loss of 123g.

The ingredients.  Didn't use the milk.  That's a lot of Caraway!

The rosemary smells wonderful when you are tearing it apart to put in this dough.  The fresh onion also has a lovely scent that makes you weep with joy. Or it may be the enzymes acting on the sulfoxides.

Speaking of enzymes: I've been researching/thinking a lot about which enzymes are in the flour, which get activated by Reinhart's  delayed fermentation methodology, and which ones get added due to ingredients.  Here we see onions being added that are chock full of enzymes.  The evidence will make you cry: allinase and lachrymatory factor synthase tear apart the sulfoxides in onions when they are cut, and we get this gas released to the air that irritates the eye and makes us tear up.  Onions have lots of other enzymes and affect the pH of the dough.

As far as other ingredients or additives that one could add to the dough to increase the enzyme activity, I have been on the lookout for some diastatic malt, which I would like to try adding to some of the simpler loaves I've been making, to see if I can persuade them to approach Reinhart's loaves in taste.  This is an extension of the experiment I performed the other day (the simpler Meteil), to see if it really was the enzymes that made Reinhart's loaves so sweet, or if it was merely the enrichment (honey, molasses, etc.).  So far, I haven't been able to obtain any diastatic malt.  All of the winemaking places near me seem to have closed up shop or moved.


Back to the task at hand: I mixed up the final dough and kneaded it.

I didn't add any extra milk

This dough kneads quite easily by one hand method.  Cutter not required.

After one hour, the dough has not expanded to 1 1/2 x the size, but it has expanded a bit.

Nevertheless, I turn it out on the floured counter and divide it as per the instructions.


The dough relaxes a bit, more than it rises

I was originally going to make one big boule, but opted instead to follow the recipe and divide the dough into 2.  At which point I decided to make some smaller batards, so they would fit better on my (recently cracked) baking stone.  I don't think that this dough is really tight enough to see any further rise or oven spring.  It is more like working with soft spam or meatloaf consistency than with dough.

I scored the loaves.  

Remembered this time.  And I did a pretty good job of it too.  Learned recently on the 'bread heads' forum that a very quick serrated knife, not vertical but instead fairly shallow, would score better and wouldn't drag the gluten.  But frankly, I didn't think it would make much difference: this dough wouldn't get any oven spring.  But it baked okay; perhaps I ought to be baking these loaves another 5 minutes, I don't know.  When I pick them up to move them, they seem very fragile.  But then, that is when they are still warm.

The Potato Onion Rye Meteil Bread is set out to cool overnight


The next morning, my wife "encouraged me" to freeze these two breads, so no crumb shots of them...for now.  They still feel somewhat fragile to me, as I place them in a bag to freeze them.  They smell great, even this morning.  Onions predominate in the scent.

All of these Reinhart Sandwich Breads have a very delicate, very moist crumb.  The Seigle (which I am still eating, a slice or two each day) is particularly crumbly around the top score mark.  It might be a symptom of an oven being not quite hot enough, or a loaf not baked long enough.  Perhaps this is what Reinhart's sandwich loaves are supposed to be like though, who knows?  I think I prefer a bread that hangs together a little better, though.  The taste may be superior, but if it falls apart as you lift it to your mouth, what good is it?  I am still awaiting the baking of the hearth breads.  But I am not yet half way through baking these enriched breads.

Update:
I thought this bread tasted okay, but it was nothing special.  My wife, however, did not like it one bit.  I ended up eating one loaf all by myself, and the second loaf got neglected, although both were pulled from the refrigerator at the same time.  Before I could get to it (I was experimenting and eating a lot of other fine loaves, of course), there was a bit of mold forming on it.  My wife tossed it. The crumb shot is from our camping trip.


It seems unlikely at this point that I'll ever make this particular loaf ever again.

Notes to Myself:
  • Consider that there may be times when your dough will not expand to 1 1/2 times the original size in the prescribed time (45-60 minutes).  (Why didn't it?  It had yeast, in addition to my wild yeast starter.)  Consider waiting for the dough, instead of slavishly following a schedule.  Even if it is midnite and you are exhausted.
  • Weigh your potatoes before you have to use them, to make sure that there is enough.  If there isn't enough potatoes, what other starchy thing might you use in its place?  Consider flour: and it doesn't necessarily have to be either the rye or whole wheat flour that the bread already has.  Why not oat flour, or rice flour, or spelt?
  • With 2 cracked stones, I have stacked one on top of the next, with the cracks going in different directions.  Perhaps with this method, you won't need to get a new baking stone right away.

Everyday Bread #48 - Revisiting the German No-Knead Bread, in Whole Wheat

Brot ohne Kneten: German No-Knead Bread Revisited


The last time I made this rye loaf it was with all purpose flour, and I put it into a cold casserole dish.  Despite the failure I experienced that day, I had been impressed with the recipe's simplicity.  Today I wanted to use my fully preheated cast iron Dutch Oven, and I thought I'd just swap out the all purpose and use whole wheat instead.

I should have known it wouldn't rise.  Even though it sat longer than 18 hours.  I'd say it sat about 22 hours.


I folded it twice only on the counter with the pastry cutter, then I formed a boule and set it on the couche like Lahey does.


No rise seen in this dough. It was wrapped 2 hours, with some rye on the couche.


Not quite enough rye on the couche.  It tore a little of the surface of the bread, getting it into the Dutch Oven.


I scraped this dough off and put it into the granola bars.


Unlike the last time I made this (when I used all purpose flour), this time the bread comes out clean, but it  is flat, it has not risen at all.


But look at the rich, dark chocolatey brown of the loaf.  This is the colour that my baking of the recipe for Reinhart's Rye Meteil should have looked like, and never ever did.

Update:
This loaf never made it to camping, but was waiting in the freezer when we got home.  The crust, by then, was very hard, but even after two weeks the interior crumb was moist and the bread tasted good.  Rye bread does keep well, but I don't think it freezes well.  Here is a crumb shot.  This bread didn't rise.


Notes to Myself:
  • Set this Rye aside and take it with you when you go camping.  Rye bread is supposed to keep a bit longer than other breads, and actually improve over the first few days.  Test this theory with this loaf, which is made wholly from yeast and no sourdough.
  • Try a hotter oven for the Reinhart Meteil recipes, and don't be afraid to leave it in the oven a bit longer during the baking,  if you want the dark chocolatey brown of the loaf.